Tuesday, February 14, 2012

My Jewelry Shelf

I'm sure most of you have seen the huge variety of this being turned into jewelry holders.  I've seen a ton!  I decided that his shelf, that no longer had a home in our house, would be the perfect redo for my jewelry hanger!  I desperately needed one and this cute little shelf was just sitting there with nothing to do!

 Before
 Here are my little helpers!
 Aren't they cute?
I took the hardware off and gave it a little light sanding, so the new paint would adhere.  I wiped it down when I was done to get all the extra dust off and began spray painting!  The greatest thing is that after I did my first light coat of paint I realized that with this original finish and the black paint I was using, it gave it the same kind of look as our bedroom furniture.  The cappuccino finish, with some lighter touches of "wood" shining through.  So, instead of doing it jet black I just did one more really light coat of black to fill in any spots that still needed a little more color and I have this...
I'M SO EXCITED!!!  I've been waiting to take a picture because I was waiting for my husband to hang it on the wall, but I decided to just do it myself! :P  I couldn't be happier!

Monday, February 13, 2012

100th Day of School Project!

Valentine's Day just happens to be Kennedy's 100th day of school!  And she's in kindergarten, so of course they are celebrating 100!  I saw this idea somewhere on pinterest.  No idea where, but I cutified it!  We drew a heart around her monster instead of a circle and made hands and feet.  I think it's pretty cute!

 Just glued them on with fabric glue that is okay to wash and wah lah!  I used dry erase marker, for the reason of, it's what I had and I've learned from my experience as a mother that it doesn't come out of clothes! LOL!
The sun was in her eyes, but I think it's pretty cute, and will look even better tomorrow with jeans! :)

*And here she is all ready for school!

Saturday, February 4, 2012

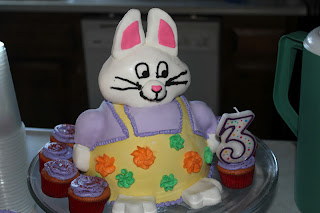
Ruby Cake!

(From Max and Ruby) Not bad for my first attempt.  Sad thing is I did this cake so I could play with my new Cricut fondant cutter, but I procrastinated making it so long that I didn't have time to take it out and play.  I think it would have been way cuter if I had!  But, I'm pretty proud of myself!


Reegan just LOVED it!  The only tragedy was when I took the head off to cut the cake!  She was a little taken back and not too happy, but we all laughed and she got over it! LOL!  I got the recipe for the fondant from HERE. I thought about doing instructions on here for it, but really I couldn't do it justice.  So, go check out the instructions on that blog and start making cakes!  

Friday, February 3, 2012

More hats

I'll add the patterns I used another time, but I wanted to share these cute hats I made!  I'm donating them to our Young Women program at church.  The girls are doing an auction to raise money for their summer camp! I hope people love them and buy them! :)


Craft Stick Puzzles

Of course I found this idea on Pinterest and I sent the picture to my mom.  She made these for my kids for our Sunday bag!  Now that it's done I've come up with ideas to make it better. 


First thing, use white glue.  My friend tried making these after she saw ours, but she used a hot glue gun and the pictures are all bumpy and it was kinda a mess.  Second, center the picture on the sticks.  Can you see the left edges are getting all bent?  There should be some stick showing on each side.  And lastly, my mom said when she did it, she glued the picture on the sticks and didn't leave enough room for her razor blade in some spots, so she ended up cutting some of the wood.  So, leave just a tiny space big enough to get the blade through.  I plan to make more of these with family pictures.  My kids love them!

What is it?

Can you tell?  Haha, I doubt it! 

 What about now?

Yep, I made my girls sleeping bags for their 18 inch dolls!  And the best part is it only took me 5 minutes for each sleeping bag!  How?  I went to Ross and bought cloth place-mats and sewed them together!  Line them up, fold down the top edge of one and sew along the edges.  Add a ribbon in the back so it can be rolled up and Wah Lah!  A beautiful sleeping bag!  Don't worry, my girls didn't know what they were either, but they love them!